Email Marketing From Scratch (Part 2)

This is part two in a series about creating my own email marketing infrastructure. Last week we talked about how I got started with my email marketing. Click here to read that if you haven’t already. I found a collection of businesses I could contact, got it saved locally so I can work with it, and analyzed all of the websites in a small area around me so that I could prioritize who to contact first.

This week, we’re going to talk a little more about the methods I used to construct the marketing emails. In my experience, email marketing is a fickle experience with lots of places to get into trouble. Where it’s easiest to get into trouble before you start is the server side. See, email isn’t just a communication between two individuals, it’s a communication between two individuals via two or more computers, each with its own rules about what is and isn’t allowed.

Spam is the problem. Spam has been the problem since the advent of email and email marketing. Obviously, our marketing can’t be effective if it is categorized as Spam, to avoid that we have to understand the common ways servers identify Spam:

  1. Image to Text Ratio
  2. Number of external links
  3. Attachments & Size
  4. Volume
  5. Content of the text

Image to Text Ratio
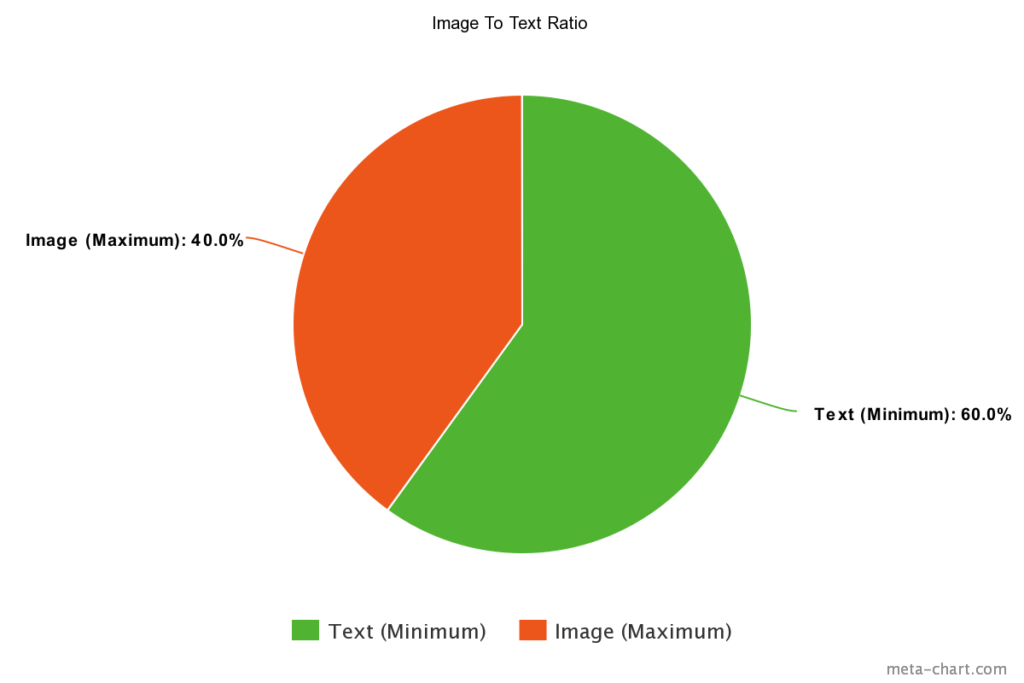
Most providers recommend at most a 60:40 ratio of text to images.
While there is no hard and fast rule as this varies between servers, following a 60:40 text to image ratio provides the most consistent deliverability while also meaning your readers are more likely to actually engage with the email.

This percentage is a visual rule, so use this when creating your layouts. And whatever you do, never bake the text portion of your email into the images. This will make it harder to deliver your email, and make it harder for users with disabilities to engage with your marketing.

This is one that is a lot more common now than it used to be, and I’ve seen it throw several businesses for a loop. I absolutely understand where they’re coming from. An email that has striking images and pops with color and style is much more likely to stand out from the rest of a user’s inbox, and marketing often boils down to trying to stand apart from the pack.

But the issue is that not everyone that uses email is doing it just for communication or marketing. There’s a whole world of malicious email out there, and one of the tactics they’ve been using in the last few years is sending their messages as images so that the content of the email can’t be scanned for common Spam patterns. Since it takes a lot of computing power to analyze the text in images, server administrators frequently rely on a ratio of images to text to determine if an email is likely to be Spam.

This means you have to be very careful about the number of images you include in your email so that you’re not likely to set off the rules in place to protect users from phishing and other social engineering scams likely to use these tactics.

Number of external links

The purpose of Spam is usually to get a user to perform an action of some kind. Spam emails and marketing emails are not so different in this. In most cases, this is done on an external website so that there is less evidence of what is happening on the email server. To accomplish this, many spam emails are just littered with links in an effort to get the user to click on even one of them and be transported off to where the spammer has full control.

To make it even more complicated, the number of images can also count towards setting off this rule as they all count as requests to a remote (and therefore suspect) server.

The best way to approach this is to insure that your email has a clear singular call to action. A single thing the email itself is asking the user to do. Usually this will involve clicking a link to be directed to your website to get more information about something. If there are any other links in the email, they should direct to the same website if possible, and be kept to a minimum. The rule I try to keep to is no more than 4 links per email. That way any additional requests can be used for images, but as mentioned above these should also be limited to only a few.

Attachments & Size
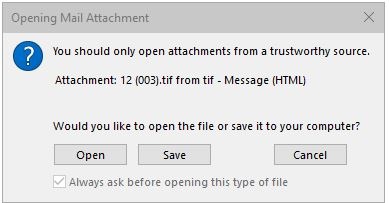
A warning dialog triggered by an email attachment
Is this the first impression you want to give your potential customers?

Attachments are an important part of the email protocol. They are extremely useful for getting files between people over a distance. For this reason server administrators won’t outright ban attachments, but since they are also the primary way that viruses are spread through email the rules they do put into place can be pretty draconian.

My advice, avoid using attachments entirely if you can. And never send an email with an attachment as your first point of contact with someone. It very likely won’t go through. If you do have to send an attachment, try to stick to images and PDF files. Any file format native to Microsoft Office is frequently abused by malicious actors and some server administrators will outright block them, with good reason.

Most emails these days are actually little different than full webpages. For this reason there can be a lot under the surface that the user never sees, and that means that things can be done to try to abuse that privilege. Server administrators are practical people, and rather than trying to keep up with all the new strategies, they just put a max cap on the filesize of the email to make this less viable.

For this reason, you should try to keep the size of your entire email, including remote images and attachments, less than 2MB. This also goes a long way towards making your email more friendly for mobile users who may not have strong network connectivity or limited data.

Volume

Spam campaigns are done in units of thousands and millions. Each individual email is very unlikely to get any takers, so spammers get around this on sheer automated volume. Server administrators have known this for decades, and set up networks of servers to keep track of email volume from servers across the world, and when one gets too large those networks will warn that there is a potential spammer and may recommend blocking all emails from that server until the problem is taken care of.

This is a bad situation for a server administrator to be in, because proving the problem is fixed can be difficult and time consuming, so a lot of servers enforce their own rate limiting protections and will shut down your account if you surpass those limits. Unless you’re using a service built for large scale email marketing, your best best is to limit yourself to only sending less than a hundred emails an hour, and significantly less than 750 emails a day. Keeping in mind that your email server may be more or less strict, but you can set off this rule on the servers you’re emailing as well as the one you’re emailing from.

Content of the text

Finally, you have to be very aware of what you are writing in your email. Spam has been around for decades, and a lot of servers and server administrators have been too. There are all sorts of phrases and words that will blacklist your email outright, and larger email providers are even using AI to analyze the text of your email and make judgment calls about how likely it is to be Spam.

Be clear and honest with your text. Trying to deceive someone or trick them into doing what you want will almost never convert to a sale anyway, and it greatly increases the risk that your email will never be read. Don’t ramble too much and confuse the reader with more information than they need. Choose a single subject and a single call to action for that email. You can break this rule a little with newsletters, but you should never send a newsletter to someone who hasn’t opted into receiving them.

Next week I’ll go into more detail about how I crafted my emails according to these rules, and the systems I built to help automate that process.

If you’d like to learn a little more about how to optimize your website, try my blog post on image formats.

And, if you can’t wait until next week to learn more about my approach to email marketing, or you’re interested in talking about any of the services I offer, fill out the form below to get in contact with me directly.

Email Marketing From Scratch (Part 1)

Getting An Email List

I’ve been pushing email marketing of my services a lot lately.

Chances are if you are reading this blog post, you may well have come from one of the hundreds of emails I’ve sent over the last few weeks. And I thought to myself, this might be a great chance to break down how I solve problems and give you an idea of how my methods will fit with your business.

First, let’s look at the problem:

Email Marketing, or more explicitly, Email Marketing With Little to No Budget.

Like a lot of older forms of marketing, email marketing has had a drop off in effectiveness over time. This means that while it is by no means an ineffective form of marketing, it is one with a relatively low yield. Since I effectively have no budget (other than my own time) to spend on marketing for the moment, it’s not a tactic I would normally consider. Or at least, I wouldn’t consider it if I hadn’t found a large database of local businesses one morning while I was drinking my coffee.

An online database is good and all, but nothing can be reliably automated around a resource that you don’t control. The first problem to solve was how do I take this online database and transform it to something I have control of localy, to modify, update, and prune?

If you’re not following web tech news you might have missed this story, but a few years ago a California federal court established that as long as the information is not behind a login screen of some kind, it is not illegal to automate the process of scraping that data from the website. (Here’s a link to an article about that if you’re interested: https://arstechnica.com/tech-policy/2017/08/court-rejects-linkedin-claim-that-unauthorized-scraping-is-hacking/) That said, putting undue stress on the server hosting the information does venture into the realm of the illegal (and just plain rude), so I had to balance the act of getting the information I wanted and not abusing the server providing it.

I settled on writing what I call a “respectful” crawler, which I do by limiting the number of requests I allow it to make. This slows down the whole process, but it ensures that the website administrator doesn’t have to throttle my connections or outright block me. Gathering information isn’t a new automation task for me, so I have a pretty solid workflow, and had a functional crawler in three parts in about four hours.

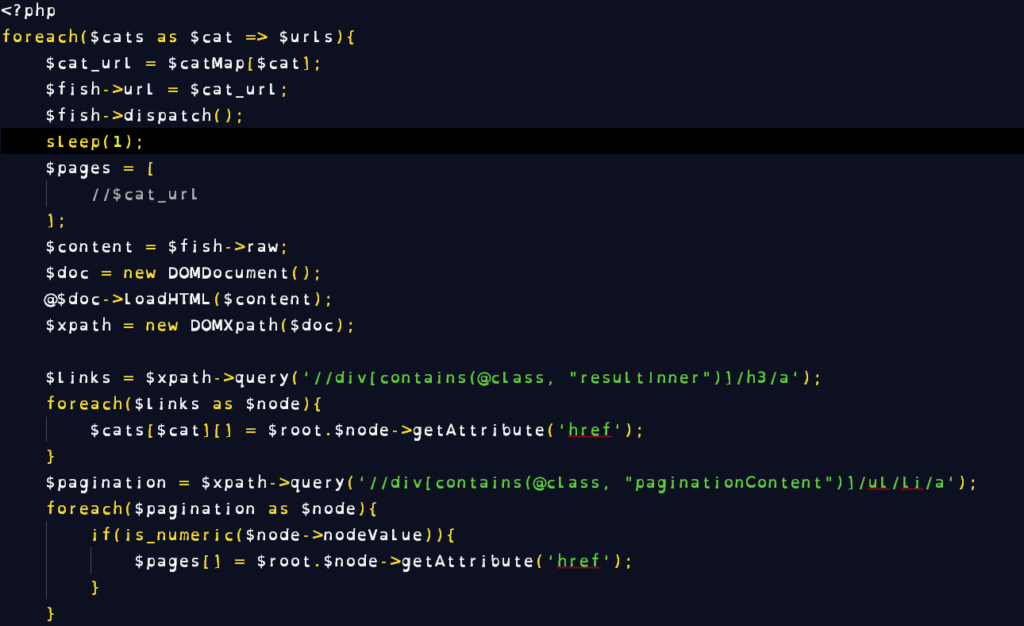
PHP code snippet from script that crawled the online business database
I think I’m funny, so my remote server communication class is named after the Babel Fish from Douglas Adams’ Hitchhikers Guide to the Galaxy

The database was divided into categories and lists of businesses, which I crawled to get a full list of the pages that I wanted to pull information from. I then crawled every page in that list to pull business names, addresses, phone numbers, and websites where available. This process took several days and netted me a database of well over 30,000 businesses. To reduce this to a more manageable number, I limited my next steps to businesses within Stroudsburg and East Stroudsburg with a listed website.

Next, Organization:

Now I needed to gather information about the websites so that I could recommend services. The Google Page Speed tool that I mention in some of my emails has a free API that can be used to automate website analysis. So I then wrote a script that attempts to contact the listed website for the business, and if the website does exist at that address, it passes the website to the Google Page Speed API which returns a report that it then saves to the database of businesses I am building.

Sample Page Speed data for my own website
This is how a subset of the page speed data appears in my database’s GUI.

Based on that report I am able to log scores in different categories to give me a better idea of what areas the website can be improved in, and more importantly, list the websites in order of ones that can best benefit from additional work. Hopefully allowing me to prioritize businesses that will be more likely to respond to my email marketing.

At this point, I have a database of businesses I want to contact and an order I want to contact them in. Join me next week as I walk you through my next steps and start crafting the way I will contact them.

If you’d like to learn a little more about how to optimize your website, try my blog post on image formats.

And, if you can’t wait until next week to learn more about my approach to email marketing, or you’re interested in talking about any of the services I offer, fill out the form below to get in contact with me directly.
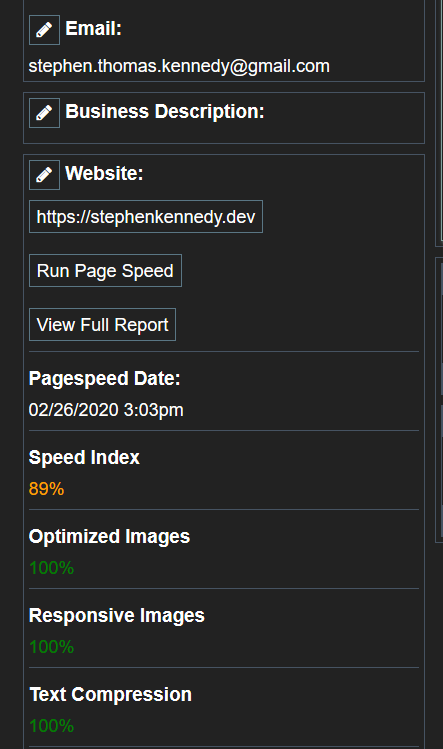
Image Formats and You

So, are you tired of posting 20MB PNG images to your website and making all of your web developers cry as they die a little more inside?

Realtively high quality JPEG
All of the examples in this post are going to be variations on this relatively high quality JPEG image. If you open the image by itself, it is a full HD 1920x1080px image with a filesize of 237kb, well within what I would call optimal filesize for an image of this size.
Credit for the original photo: Photo by Etienne Girardet on Unsplash

Note: My website does use automated image optimizations, so it’s possible that the image you see above is not the format or the size I’m describing. Please click or tap on the image to see the full quality.

The secret to making web optimized images is actually pretty simple. There are three main rasterized formats you should be aware of, and one other one you should probably just let your developers (or a plugin) manage for you. I’m going to go through pros, cons, and use cases for all four.

JPEG

This format is really common, and often disparaged for the obvious compression artifacts that are a side effect of its compression method (large squares you can easily see in lower quality images).

JPEG – PROS
-Supported by all browsers.
-Highly variable compression meaning you can dial in the quality to match both your size and visual needs
-The most efficient way to compress images with many colors and photos while still getting acceptable quality.

JPEG – CONS
-No support for transparency
-High quality settings can result in very large files
-High complexity images can show very obvious visual artifacting on lower quality levels
-For simple images with few colors, this can result in a much larger file-size than other formats

Low quality JPEG example, note the artifcating, especially around the solid lines.
This is a low quality JPEG of the same size. The filesize is roughly 1/10th of the original, but displays significant JPEG artifacts especially around the hard lines of the pool edge and ladder.

Note: My website does use automated image optimizations, so it’s possible that the image you see above is not the format or the size I’m describing. Please click or tap on the image to see the full quality.

JPEG – USES
By and large, this is the best way to make photographs and images with high color counts reasonable sizes to be viewed online. This is for the same reason that JPEGs can show those terrible square artifacts. JPEG compression works in a grid, compressing each grid separately to reduce the number of colors used. By breaking the process down it can use relatively restrictive color pallets (which make for smaller file-sizes), and rotate them based on what is in that particular grid.

PNG

This is the second most common format online. PNGs tend to look a lot cleaner and show more consistent color across the image.

PNG – PROS
-Very clean and efficient format for images of relatively few colors
-Support for transparency
-A “true-color” format. One of the most accurate web safe formats for color.

PNG – CONS
-For images with high color complexity, file sizes balloon fast
-Common image techniques like anti-aliasing and blending raise the relative color complexity of images very quickly

Low resolution PNG example, note the color accuracy of the image, but also note how much smaller it has to be to be appropriately sized for the page
This is a PNG of the the same image. At the same resolution, the resulting image was well above 1.5MB, and to reduce the filesize to a similar level I had to reduce the resolution to 500x333px. But also note how color accurate this is compared to our high quality original.

Note: My website does use automated image optimizations, so it’s possible that the image you see above is not the format or the size I’m describing. Please click or tap on the image to see the full quality.

PNG – USES
Icons and low complexity accents are great as PNGs. Since PNGs encode every color in the image and use it throughout, this is a best rastered format for maintaining accurate branding. Additionally, because of the same encoding, filesize is most closely related to color count rather than image size, so a low complexity PNG of a large size can still be relatively small. This is why PNG photos are so large, but huge business logos might be orders of magnitude smaller.

GIF

GIF as a format has fallen out of favor in the last decade or so, but it’s still important to know about as it can still solve some problems.

GIF – PROS
-Support for transparency
-Supports frames for animation
-Can result in very small file-sizes

GIF – CONS
-Restrictive color palettes can result in low color accuracy
-Improvements in video encoding mean that the same animation encoded as a video and a GIF is usually smaller and higher quality as a video file.

Low quality GIF example, to demonstrate the restrictive color palette of the format
This is a very restrictive GIF pallet, the lowest Photoshop would allow me to use, so that you can easily see how GIF uses dithering to try to account for its restrictions. While this image is of a significantly lower quality that our original, but at 424kb it’s almost twice the size. A GIF can result in a smaller filesize, but often only if extreme compromises are made to get there. This is the reason that GIF images have fallen out of fashion with web designers over the years.

Note: My website does use automated image optimizations, so it’s possible that the image you see above is not the format or the size I’m describing. Please click or tap on the image to see the full quality.

GIF – USES
If an element is in the background, has a restrictive palette anyway, or is going to be moving, using a GIF might result in a smaller file-size than a PNG. They often look a little better than the more restrictive PNG-8 Encoding. I don’t think this is a format you’ll find yourself using all the time, but it’s always nice to have another option when you’re trying to shave filesizes.

WEBP

WEBP is a format developed by Google that combines the pros and cons of JPEGs and PNGs to compress both even further. At this point, it’s pretty widely supported by browsers, but it isn’t supported by all of them. My recommendation is to save your files as any of the above and upload them to your website. If you are working with a developer, there are tools available for them to easily convert them to WEBP, and there are many plugins available for popular CMS solutions to do the same thing automatically. In both cases, your website can be configured to optionally serve those images instead of the originals if the browser supports it.

You might notice that I’m not including an example image, that is because if your browser supports it and my image optimizations are working correctly, my website will have silently replaced some of, if not all of, the above images with WEBP copies. The real advantage of the format is that in a lot of cases, writers and designers can keep using the image formats they’re familiar with and the server can handle all the heavy lifting of putting WEBP in place if possible.

A Note on Vectored Images

There are many cases where you might choose to use a vectored image instead of a rasterized one. Online, the only vector format you need to worry yourself with is SVG, and I strongly recommend you work closely with a developer to decide when and where you should use SVG images, as the nature of the format means that they can quickly grow in size if you are not careful. That’s not to say you should avoid them, as a well made SVG means that your image will look amazing on any size screen.

If you have questions about how you can better optimize your images, or any other services I provide, please fill out the form below to get into direct contact with me, and join me next week when I start a several part series on Email Marketing.

Can’t have a party without a Mask

For a few months this year, I was working with an internet marketing company in the middle of a hard pivot into print marketing. Personal disagreements with this as a business strategy aside, it did put me into contact with a number of unique problems to solve. And if you know anything about me, it’s that I do love a unique problem.

In this instance, we were retrofitting their existing website with a new design and most importantly a new builder app so that customers could customize their printed goods (custom holiday cards, ect). Since I was the only web developer working on this project full time, we elected to use an existing App that gave us a fair amount of latitude in re-branding and in the kinds of designs we could construct in it. We decided to use a service called Pitch-Print. It was a very strong service, and while it had its problems, I enjoyed working with their app overall.

The Problem

Pitch Print was entirely based on web technologies, and was designed to be compatible with the largest number of browsers possible. This means that features that were included were constrained by not only developer time, but by what the collection of browsers they targeted could support. This meant the developers ended up developing a lot of odd solutions and shims to add support for edge cases. One of those edge cases, masks, happened to be a large component of the Holiday cards we were tasked with getting into the Pitch Print app.

If you’re unfamiliar with what a mask is, it is a shape that can be used in computer art to constrain another piece of art. In our designs, we were using it to essentially crop uploaded user photos to fit the designs.

In this particular instance, the solution their team came up with was a very specific subset of SVG markup that could then be turned into a mask. This markup could not contain any meta data, and could not contain any elements outside of the path element. Adobe Illustrator and Inkscape do not export in this format, and were noted as incompatible in their documentation. To complicate this further, on testing we discovered that paths that were compatible could not be correctly rotated, so we had to use paths that were at the exact angle already. And of course, we were on a strict deadline so we only had a few days to get a solution in place.

The Method

Like many of my ideas, I had this one while I was sleeping. I have a long running joke with everyone I talk to about what I do for a living. People say to me, “Well, you’re obviously good at math”, and I respond, “No, I’m good at telling the computer to do the math for me.” It’s still nagging at me even now, that there’s probably an equation I can run to do this work, but we didn’t have time for me to do the research, so I went with what happened in my dream.

Basically I lucked out, because every mask we needed to generate was a rectangle.

I took whatever placeholder asset our designer used to define the mask and I painted it onto an HTML5 canvas element. I then extracted the pixel data of the canvas into a large nested array. I set up a while loop to test the pixels one by one until it encountered a pixel with a non-zero alpha value. By reversing the x direction, the y direction, and then the x direction again we did this four different times finding four different points. The four points of our rectangle. With these four points, it was easy to turn that data in to an SVG path that Pitch Print would accept. The whole thing took me about 2 hours to prototype and an additional 4 to wrap in an electron app so that I could have access to the file system to write the results to files and do multiple masks in a batch.

This image is lifted directly from the prototype. The white is our asset we are analyzing to create the mask. Red pixels are pixels that have been tested and found to be empty, black pixels are untested, or found to have a non-zero alpha channel.

The Result

The masks weren’t perfect. Because I was using raster images to calculate approximate positions of vectored coordinates the angles weren’t exact, but in what amounted to a little less than one work day I had a “good enough” solution that allowed us to get the designs up and available for sale well within our deadline, and because we were working with SVG files, ones that were obviously wrong could always be tweaked by hand, and others only myself and the designer could see the mistakes in.

So, this is a solution that I proud of because it worked and we got deployed quickly, not because it was the “right” solution. If I had more time with the problem, I probably would have written a utility to parse and modify the SVGs that Adobe Illustrator could generate, as this was where our designer was working and would have all but eliminated the approximation problem with the coordinates. That’s still something that I think I would enjoy writing, but I’m not sure I’ll ever have explicit reason to.

That said, because the prototype was written entirely in JavaScript, I went ahead and hosted it on the site so you can look through the functional code yourself.

You can find that here: https://stephkennedy.dev/experiments/mask_proto/index.html

All the code is in the document, so feel free to inspect the page and look through it. It’s not complex by any means.

Automated Site Security

This blog post is going to be a little different for two reasons.

  1. This is going to be a discussion of a security product that, to the best of my knowledge, is still in active use on real websites, so publicly posting the code would not be in the best interest of those clients.
  2. The code that I wrote was written for my employer, and so I don’t own it.

So, there will be no code samples to go with this post. That said, I think it is still well worth talking about, and it’s a great demonstration of how a solution can evolve over time to meet new needs.

The Problem

When I was first hired in October of 2016, my employer was a small company just growing out of a large staff turnover that specialized in providing IT services to other small businesses. The owner was doing the majority of the development work himself, and needed someone to take as much of it off his plate as possible so he could concentrate on other aspects of the business. He ended up hiring me and giving me an opportunity to grow and to learn. At the time of my hire, I was entirely self-taught, and my only experience with PHP and SQL was with a few online tutorials I was working from in order to complete a freelance project I was working on at the same time.

Because the owner was busy, I continued to be almost entirely self taught, but because multiple clients were waiting on me there was a lot more motivation to learn and to learn quickly. For about a year, I would also be the only full time developer.

One of the first things I learned in that time is that a combination of a stretched or new development staff and lean budgets from clients ends up creating an environment where highly technical aspects, like security, are ignored, overlooked, or plain forgotten. And this is true of both sides of relationship, clients and developers.

In short, because I was supporting a relatively large number of clients, somewhere around 10 – 15 clients on a regular basis, and 100 or so on an as needed basis, and I was still a relatively new developer, many potential security compromises slipped through the cracks, and you can bet that bad actors from the internet took advantage.

We were lucky. We had a combination of understanding clients, regular site backups, low value sites, and bad actors who were more interested in defacing websites than making a profit. And that combination allowed me to learn effectively and quickly how to deal with problems like this, and slowly craft my own automated solutions and defenses to prevent it in the future. Each event was a chance to learn, grow, and improve the service we were providing to our clients.

The Methods

I’ve already mentioned the first method. This is the main method we used at first because it was the simplest and most time effective. But we maintained regular weekly, monthly, and yearly backups. Since the majority of the client websites didn’t contain any overly secure information (the clients frequently didn’t set their own passwords, and their databases only contained information about the site itself, no customer or user data), this was enough to resolve the most obvious issue and reverse whatever damage was done.

Now, you’ll note that this did not remove whatever exploit the bad actors used to break into the website in the first place. But it did mean that the websites could return to their purpose of providing information to the customers of those businesses.

After a while, our college intern joined the company full time, and I was able to spend more of my time on server administration and infrastructure. At this point I was able to spend some time writing a horrifically simple crawler that would check the homepages of websites and try to determine if they had been defaced.

The code itself is laughable to me now, but the ideas behind it were sound. We had a database of the websites that it would crawl, and it would save whatever it found to that database. It would compare that to the last known crawl that was tagged as “Clean”, and if there was a difference between the two it would alert me. As I continued developing it, it would also look for the most obvious sign of defacement the term “hacked”, and it did this via a simple string search. Like I said this was super simple code, but it was a functional prototype. It was checking for things that I normally do manually, and it could run in the background while I worked on something else.

It had a lot of downsides though. First of all, the database was huge. These days I would use hashes for storage and comparison, but then I was storing the full HTML (so that we could analyze it after the fact I suppose). The script was also slow. It did not work in parallel, and since it ran locally it was dependent on the network resources available to it. The server was located in a data center in another town, and so the script could be a network hog. While the script was running, accessing any resources over the network from the same device was noticeably slower.

That said, it also helped us recover sites before the defacement could start to effect their SEO and page rankings, so I pushed forward on the development. At first, this was just checking for the existence of the correct Google Analytics codes and site registration meta tags, things that were frequently forgotten by rushed developers or clients who didn’t know better, so having automated oversight to ensure that clients weren’t getting short changed added significant value to our services.

The next step was to move this script up into the server itself so we could do it faster, and potentially use the extra overhead to do more complex analysis of the websites. Once that was done, the whole team could use it regularly, and multi-tasking while it was running was easier.

Now, at the same time I was developing this automated site health monitor, I was doing a lot of research into how shells worked, how they were uploaded, what they did when they were, and how they were accessed. I had a number of samples from the folks who were defacing our websites, and I was able to start reverse engineering them over time. I even wrote a few of my own to learn first hand all the ways they could be written, and what the commonalities of them were.

One of my first solutions was all about identifying changes in the file system. It was also super simple. I just used the terminal to create a list of all files in the hosting, and then I output that list to a file that I would save outside of the hosting itself. Then on a regular basis, I would generate a fresh list, and have the terminal show me the differences between the two. This would point me in the direction of files that I would need to check manually to ensure the code was not malicious. This was still mostly manual, and time consuming on our larger hosting clients, but it also meant that I was finding more of the problems and had a much better idea of the kind of activity that was normal for different accounts.

After a few months I had enough information on the problem that I was starting to think of a solution.

One of the first WordPress plugins I was taught about was Wordfence. Their security research team does a lot of good work, and their plugin is a must install for every WordPress I work on. So when I was trying to design a solution for our clients not on WordPress, their code was the first place I looked. Credit to the Wordfence team, most of their code is not stored in the plugin itself. It is done by their API, which is incredibly important for a security project working in an Open Source ecosystem, written in a language that is not precompiled. It means that bad actors can’t pick apart exactly how their code works and easily write their way around the defenses put into place.

But, what you can learn is how Wordfence ensures that its code is executed before any other WordPress components. Now, I wouldn’t be surprised if there weren’t several methods used to achieve this effect, but the one I found was that it used a part of the settings of PHP called “auto-prepend-file”, which just instructs the PHP process to always include the declared file before running any other code.

I played with that for a while, and then I just ran with it. I took my idea of the list of files, and I wrote a PHP script that could generate that list, save it to a database, and update that list as needed. Then, I wrote a very small file that would be loaded via “auto-prepend-file” and compare whatever file loaded it to that database. If it wasn’t in that database, it killed the process with a generic error, effectively cutting off access to any stand alone shells that were uploaded, which was about 80% of what we were seeing.

In hindsight, it was exceedingly simple, but it was also hugely effective. That first version effectively stopped the vast majority of the events we were seeing on the server. It wasn’t perfect. It could get easily confused by the way WordPress or OpenCart would rewrite URLs, but as WordPress already had a strong solution and OpenCart is… well OpenCart (and since that was only a small fraction of our client-base). It was a compromise we were willing to make, and the code was simple enough that if we needed to do on the fly modifications to create site specific exceptions we could do so easily.

The other big downside of this version was that if the file was in the database, it was executed, no matter what was in the file. So I turned back to my inspiration, Wordfence. This time, it wasn’t the code of Wordfence itself, but an extended blog-post they did about a strain of WordPress malware they were calling “Baba Yaga”. The malware was designed to turn infected websites into illegal traffic farms for ad networks and scam sites. In order to operate as long as possible without detection, the malware would actually scan the WordPress installation for other, more obvious, forms of malware and remove them automatically for the user. Looking at the code and reading through their explanations I knew that while I didn’t have the background, or the resources, to write a full website antivirus, I could start looking for patterns and flag files for review. I was already crawling the file system to generate my list of files, so I had half of the code already.

I approached the problem from several directions under the belief that something that generated false positives would be better to start with than something that missed obvious signs. The first and easiest step was starting to save the file properties to the database so they could be compared. We saved, permissions, timestamp, name, owner, and a small hash of the file contents. Between these we could easily identify when a file changed and get a good overview of what had changed about the file, as well as easily identify files that were not there last time we scanned. Then I started writing out various functions and code quirks that I had seen over and over in my malware samples, and we would search for each in every file we opened, and if one of the patterns was found, we would flag the file.

The best part about these changes is that it started identifying shells that had been uploaded, but unable to be used. It’s not the most common attack, but there are a number of shells I found in normally non-executable files. Things like images, icons, error logs, text files. The attack comes in two parts, first you upload your code in a “stable” extension, and then you either modify the server settings to make that file type executable by PHP, or you change the filename to an executable extension. These were left over from attacks where the files were successfully uploaded, but they were unable to complete the next stage. This was good because it gave us more malware samples and identified more vectors of attack, helping us track down upload forms that weren’t secured well enough and other holes in framework or custom code.

At first I was running all of this manually, updating definitions by hand, running scans by switching flags in the code and visiting temporary URLs, but I had this other site health monitor project that was already doing automated scans, so I linked the two and wrote up a report that aggregated all of the information the scans were collecting.

Then I moved the definitions from being defined on a site to site basis, to being centrally stored and sent out via the API. All of the communications and commands were encrypted in both directions using a secret key that was never transmitted by either party, so even if we weren’t running on the same server, it would have proved difficult to impersonate the main API, and even if you did, the contents of each specific file were not transmitted, and the script wasn’t capable of deleting or modifying files, so no major damage could be done.

In addition to that, for truly problematic sites, we could even put in some basic upload malware scanning, detecting any of our patterns in the files listed by the superglobal $_FILES meant that we could remove the offending file, and the entry in the $_FILES array before the PHP code could do anything with it.

The Result

It was a revelation. Suddenly it was not only shutting down the majority of bad actors on our server, but it was identifying more complex attacks, and as I updated the patterns it was looking for, it started to identify security holes in files that may never have been identified otherwise.

I know for a fact that it gave a security researcher we had doing some casual penetration tests on the server such a hard time that he completely abandoned the upload attack vector and doubled down on other approaches.

In addition to that, when we had evidence that a site was being compromised despite our systems, it gave us a granular way to save and analyze user activity information in a way that our existing logging solutions did not offer. That feature helped us identify several compromised administrative users in an eCommerce site, and track down exactly what information the bad actors had access to. Unfortunately, in this instance it was everything short of payment methods and social security numbers, but I was able to close the compromised accounts, close the method of compromise, and verify that the actors were not able to regain access, while also giving the client a full report of what was compromised and my recommendations for communicating it to their customers.

Effectively, this project pushed our overall server security from little better than bumbling, to good enough that it was able to stop bad actors from taking advantage of known vulnerabilities in frameworks that clients did not have the time or budget to regularly maintain.

By no means was it perfect, but it was effective, and was probably my largest contribution to the productivity of the business. Having to manually restore backups of sites on a regular basis is time consuming. Dealing with clients that are understandably upset that their website is broken or obviously hacked is time consuming. By the end of this project, I had taken a weekly day long process that was hugely error prone, and automated it to the point where I would usually only have to spend an hour or two a month on actually securing client websites, and the rest of the time spent on infrastructure could be spent on ensuring performance, ease of access, or prototyping services that could be turned into products.

In short, it was far more successful than I had anticipated when I first set out on the project, and is a huge source of my confidence in how much my skills have grown over the last few years.

DM Tools 0.4a

Edited: 7/24/19 to reflect changes made in 0.4.1a

This is probably the largest single update I’ve made since starting this project.

First of all, all of the non-setting data saved on the localStorage object is now compressed so that DMs who have lots of rolls, npcs, and notes saved don’t have to worry as much about the 5MB limit on localStorage. It can slow down the loading, saving, but in my testing I have yet to run into that.

Next, if you didn’t gather, now you can save NPCs and Villains, and you can make custom DM notes and search them by whatever tags you set them as.

Additionally, you can now import via strings in the settings menu. This facilitates much larger imports and exports.

For example here are some NPCs and Notes from a Tomb of Annihilation campaign I’m running right now:

Since this update is so large, there are some issues I’ve noticed in my testing that I haven’t been able to resolve yet.

Changelog:

  • LZString UTF16 compressed localStorage items
  • Added UI disabling modal variant (for saving/loading/importing/exporting)
  • Added Quill WYSIWYG editor plugin
  • Added notes system
  • Added save and remove functionality to NPCs and Villains
  • Added string Import/Export system

Known Issues (Patched out in 0.4.1a as of 7/24/19):

  • Notes are not maintaining formatting (paragraphs) applied to them when they are saved.
  • Saving an NPC/Villain, editing the NPC, and saving it again without reloading or clearing the unsaved data will duplicate the entry with the changes instead of saving over the original.
  • Deleting several NPCs/Villains at once can result in a full corruption of the data stored in the localStorage object.

DM Tools 0.3a

The big change this time is that I added the ability to save and name dice notation, as well as share them via URLs. To see this new sharing feature in action, use the following link: https://stephkennedy.dev/experiments/dm_tools/?rolls=NobwRAdghgtgpmAXGAYgSwE5wEZQDZ5gA0kA9gC5TlqkRJgAcAJgGxgC+R4089AamgDGNAK4BnAAQBZUoIDWcDAE9iZStVr0AjEwAsHALpA

The link will add base level damage rolls for Fireball and Vicious Mockery. There is an upper limit of 2000 characters on the urls, at the moment. But I’ll be adding a manual import a little later on that should have no theoretical upper limit outside of the inherent 32bit limits of JavaScript.

Changelog:

  • Added LZ-String compression/decompression library by Pierre Grimaud: https://github.com/pieroxy/lz-string
  • Added persistent saved rolls via localStorage object
  • Added pop-up style modals to UI
  • Added import/export for rolls using LZ-String compression to maximize data sharable via URL

DM Tools 0.2a

I made some minor changes to make the tools easier to use on all devices, and to make room for new features in the future.

The tools are in the navigation, or they can be found here: https://stephkennedy.dev/experiments/dm_tools

If you don’t see all of the changes, reload the page. Caching continues to be a development nightmare.

Changelog:

  • Added roll expansion to notation roller.
  • Added Game Icons font from Kyle J. Kemp: https://seiyria.com
  • Added support for multiple sliding trays
  • Added settings tray and font-size settings: Font size is saved in your browser’s local storage, and is applied when the app is loaded on that device, so it will persist across sessions.
  • General CSS tweaks to better support the new features and to better accommodate mobile screens.

Making The Dice Roll

In addition to the many other geekdom hobbies I practice, I am a big fan of tabletop RPGs. I got into it about four years ago with the free version of the D&D 3.5 rules, moved from that to Pathfinder, and just recently got the D&D 5e core rule books this last Christmas.

I love the math and the systems behind the gameplay, which is probably one of the reasons that I end up being the dungeon master for most groups I play with. The combination of the love of systems with the creativity of group storytelling is something I can’t get enough of.

But to be completely honest, keeping track of a whole world takes a lot of time and creativity, a burden that’s hard to balance with responsibilities and good time management. My solution, build tools to make the whole process easier and faster.

But before we do anything like that, we have to build a very simple foundation that everything else will build from.

The Problem

Almost all tabletop RPG systems are built on psuedo-random number generators, represented by dice of different sizes and sides. Probability is stacked for and against the players with groups of these dice, and any tools that automate any portions of these games are going to need a good way to simulate dice rolls.

We can break this down to four core requirements:

  1. We need an underlying random number generator that accepts a random min and max.
  2. We need a dice notation interpreter to better facilitate translating rolls into something our system can simulate.
  3. We need a process for adding simple mathematics into the rolls.
  4. We need the ability to combine multiple dice and mathematical processes into large equations.

None of these are overly complex, but they do build on each other so that the last requirement is built on the systems we will write to satisfy the requirement before it.

The Solution & Method

We’re combining these headings for this post because we’re solving four problems, and we should discuss the solution and the method for one before moving onto the next.

First up, we need our random number generator. As anyone who has used real dice can tell you, they’re psuedo-random generators, at best. They tend to favor certain rolls based on the way the physical world interacts with them, so we can safely build on the psuedo-random generator built into the Math library. We’re not doing cryptography, so we don’t need truly random bytes.

With that in mind, the method is going to be very simple. In all the following code examples, we are attaching them to the app object, as that’s where you will see this code used in the DM Tools in the experiments section of this website.

app.rand = function (min, max){
     return Math.floor(Math.random() * (max - min + 1)) + min;
 }

Here our base level generator function accepts two parameters, the minimum possible, and the maximum possible. JavaScript’s Math.random() returns a random value from 0 – 1, by multiplying that value by a number, we can get random numbers larger than 1. The number we multiply that number by becomes the new maximum number we can return. By adding one to our minimum, subtracting it from the maximum, and adding the minimum back to the number after we have our number generated, we can get a minimum larger than zero. The only other thing we do is Math.floor() the result of Math.random() * our modified maximum so that we can be sure we are working with an integer.

With that simple function, we can technically simulate any dice roll we can think of by simply plugging in our min and max values.

But next, we need to translate traditional dice notation to something that our random number generator can work with, a min and a max value. Dice are usually pretty easy. Dice in a standard RPG system tend to include the following variations (represented here in dice notation): d4, d6, d8, d10, d12, d20, d100. In each case, the minimum possible is 1, and the max is the number of sides.

But we’re going to throw a wrinkle into this. We can roll more than one of these dice at a time, and that will create different minimums and maximums based on the number we roll. Additionally, if we every want to show an itemized list of the dice we roll, we’ll want to keep all this separated out, even if what we’re really interested in is a single integer total.

app.roll = function (sides, number){
     var output = [];
     if(number == undefined){
         number = 1;
     }
     for(i = 0; i < number; i++){
         output.push(app.rand(1, sides));
     }
     return output;
 }

The function above is relatively simple as well. It accepts two parameters, like our first one, the number of sides, and the number of dice we want to roll. It creates an array of roll results and for each die we are rolling it pushes the result to that array, which it returns. This will give us the itemized results we were looking for.

But what if we’re only really interested in an integer result, we’ll have to add those results together. So, we write a function that does just that:

app.rollStack = function (sides, number){
     var dice = app.roll(sides, number);
     var output = 0;
     for(i = 0; i < dice.length; i++){
         output += dice[i];
     }
     return output;
 }

Now we have to build an interpreter that will turn dice notation into these random rolls. If you are unfamiliar, dice notation looks like this: 2d4. Where the number of dice comes before the d and the number of sides comes after. In addition we will add some basic mathematics so we can process equations like: 2d4 + 4.

app.dice = function (string){
     //Split the dice and the procedures first
     var components = string.split(/[x\*\/+\-]/i);
     var dice = components[0].trim().split(/[dD]/); 
     var sides = Number(dice[1]);
     var number = Number(dice[0]); 
     if(number == 0){
          number = 1; 
     }
     var value = app.rollStack(sides, number);
     if(components[1] != undefined){     
          if(string.search(/x/i) !== -1 || string.search(/\*/) !== -1){
               value *= Number(components[1].trim());
          }else if(string.search(/\//) !== -1){
             value /= Number(components[1].trim());
          }else if(string.search(/\+/) !== -1){
              value += Number(components[1].trim());
          }else if(string.search(/\-/) !== -1){
              value -= Number(components[1].trim());
          }
    }
    return value;
 }

This function only accepts a string as a parameter. This is relatively limited (or brittle depending on how you feel), as it expects the string to be in the format of dice and then a single mathematical procedure. If you can believe it, this was the entire dice roller in its first iteration, as 85% of all dice rolls can be simplified down that way. But don’t worry, we’ll be addressing these shortcomings in the next step, for the moment let’s talk about what we are doing.

For this, we are making liberal use of regular expressions. If you are unfamiliar with regular expressions, I highly suggest you open regex101.com and copy the expressions into the input, it will break them down for you and explain each component. Don’t forget to switch the interpreter (it calls them flavors) to EMCAScript (JavaScript). It shouldn’t matter for these, but sometimes the differences between interpreters are subtle. It’s a wonderful tool.

Basically, we are using three basic regular expressions in this function. The first is used to split the provided string into two components, the dice and the procedure, if any. We then split the dice into number and sides. After that we feed those values to our app.rollStack() function to get our random value. We then identify if we have a procedure and which it is (via regular expression), and apply it to our value as needed.

Which is fine and dandy. In fact it’s plenty for our NPC and treasure generators that will be built on this, but it isn’t enough for a full dice roller. In a gameplay session, dungeon or game masters can frequently find themselves rolling multiple types of dice, adding, subtracting, multiplying, and dividing all at the same time. This means we need something as robust as possible.

Now I don’t know about you, but as much fun as it might be to write a toy math interpreter, I don’t want to do it for this project, not when we have a powerful tool at our fingertips like eval().

People will frequently warn you against using eval(), if possible, as it will evaluate any string passed to it as if it were pre-written javascript. This is extremely powerful, and can be ripe for abuse.

There’s a counterpoint to this argument though, and that is that so is the console included with all major web browsers. We’re going to be walking a line between both of these viewpoints. We’ll be taking some basic precautions in that we won’t be evaluating anything from the GET, POST, or localStorage objects. That way people probably won’t be able to create malicious links or forms abusing our code. Cutting off most obvious XSS vulnerabilities. In addition, we’ll be doing some basic filtering to remove most general purpose JavaScript from what we are going to eval(). But at the end of the day, this isn’t a secure application. It’s just a tool for a game, and if someone wants to break the dice roller by removing those filters, that’s ultimately their business.

So, how are we going to filter the string before passing it to eval()? With another regular expression:

app.mathEval = function(exp){
     /*
     Name: Stephen Kennedy
     Date: 7/10/19
     Comment: This function was provided by Andy E in the answers to the following stack overflow question: https://stackoverflow.com/questions/5066824/safe-evaluation-of-arithmetic-expressions-in-javascript
     */
     var reg = /(?:[a-z$_][a-z0-9$_])|(?:[;={}[]"'!&<>^\?:])/ig,
          valid = true;
 // Detect valid JS identifier names and replace them 
     exp = exp.replace(reg, function ($0) {     // If the name is a direct member of Math, allow
          if (Math.hasOwnProperty($0)){
              return "Math."+$0;
          }else if(Math.hasOwnProperty($0.toUpperCase())){
              return "Math."+$0.toUpperCase();
          }else{
              // Otherwise the expression is invalid
              valid = false;
          }
     });
    // Don't eval if our replace function flagged as invalid
    if (!valid){
          return false;
     }else{
          try { return eval(exp); } catch (e) {
               console.log(e);
              return false;
           }
     }
}

As the comment in the code points out, this function was pulled from a Stack Overflow answer. I only changed the formatting, and removed the alerts.

I strongly recommend dropping the regular expression in regex101.com to really understand it, but the gist is that we are looking for anything that looks like it’s not a number or an operation: + – / *. If we do find something that doesn’t meet those criteria, we will check if it is a property of the Math object. If it is, we’ll go ahead and replace it with a Math call and eval the result, otherwise we’ll declare the whole thing invalid and not do anything else.

Now that’s great. It lets us evaluate complex math statements, but it doesn’t natively support dice rolls, so we’ll need a shim function to add that in.

app.diceEval = function(exp){
     var reg = /[0-9]*[dD][0-9]+/g;
     exp = exp.replace(reg, function($0){
         console.log($0);
         return app.dice($0);
     });
     console.log(exp);
     return app.mathEval(exp);
 }

Here we’re turning to regular expressions again. This one I will break down for you. We are looking for zero to infinite integers between 0-9 followed by either a “d” or a “D” and one to infinite integers. We are also going to look for all occurrences of that pattern.

We pass that pattern to a string.replace(), where we will evaluate each instance of the pattern as its own dice roll and replace the pattern with the result. We then pass the resulting string with no dice notation to our app.mathEval() function where it will evaluate it based on traditional order of operations and return us a result.

The Results

I’m pretty satisfied, but play with it and make your own decision: DM Tools, as of right now it’s the left hand tray. We don’t cover a lot of fringe cases like exploding dice (4d8!), advantage and disadvantage, discarding outliers, and many of the other system specific things you might need to do. If you’re looking for a project that does these already, go ahead and check out this project on GitHub: https://github.com/GreenImp/rpg-dice-roller, as it is regularly updated and aims to support all operations in standard dice notation.

Otherwise, keep an eye on this project. I know for a fact I’ll be adding advantage and disadvantage here in the near future, as well as casting off low or high rolls.

Adding Night Mode

The Problem:

To paraphrase colleague of mine, in 2019 anything that isn’t Night Mode should be illegal.

If you’re not familiar with the concept of Night Mode, it’s a simple change that usually just switches the background and foreground colors, usually resulting in a black or gray background with lighter text. It’s called “Night Mode” because the whole idea is to reduce eye strain if you are using the app or website in a low-light environment. As someone who uses blackboard-style themes in all the code editors I can, I can also let you know that it works great in all lighting. I don’t have quantifiable data, but anecdotally it noticeably cuts down on my own eye strain and has reduced the number of times I’ve noticed myself walking away from the computer with an eye strain related headache.

Now, I like the Brutalist simplicity of the WordPress 2019 theme, which is why I never walked away from it, but in that simplicity they opted for a dark text on a white background style, not unlike the back end of their CMS. It’s simple, clean, and a lot of people still prefer it to dark backgrounds. It’s for this reason that my colleague and I have always wanted to create a Night Mode switch for our clients and just include it standard so as to increase the general accessibility of their content. Internet Marketing is all about getting information in the hands of potential customers after all.

The Plan:

CSS variables are relatively widely adopted by most major browsers these days. If I make a block of variables at the top of the “style.css” for the twentynineteen-child theme I’m slowly putting together, we should be able to easily overwrite those variables by appending rules to the HTML content as needed.

Of course, “relatively widely adopted” is not 100% adoption, so we need to plan around some browsers not being able to understand the variables and provide them a graceful failure state.

The Method:

First things first, using my favorite Web Development editor Notepad++ I opened two copies of the stylesheet. The first I scrolled through the entirety of the existing stylesheet, looking for color definitions.

And at this point, I want to call out the WordPress team a little. I understand the CSS sheets can get unruly after a certain amount of development. I know I’ve made a pigs breakfast of enough in my (relatively short) day. But despite the lovely Table of Contents you included, I had a very hard time following the logic of some of the groupings of rules, and honestly I felt a like a lot of time and effort could have been saved if you’d gone with a property organization versus an element organization. Then again, maybe most people aren’t crazy enough to sit there and find every time you use the same #0073aa to mean an element of navigation/interaction.

For every color definition I found, I left the original rule, these would form the bulk of our fallback, since the browser will default to the most recent valid rule when it encounters a value it doesn’t understand.

/*All of my rules ended up looking like this, 
don't look for this rule in twentynineteen though, 
I added it so I could have code pre tags like you're reading now*/
pre{
     background-color: #222;
     background-color: var(--dark-bg-color);
     color: #fcfcfc;
     color: var(--dark-text-color);
 }

Additionally, I added each unique non-alpha color to a block at the top of the document. Pardon the names, I started out generic, but ended up being a little too specific just so I could keep track of them as I worked through the document.

:root {
     --main-bg-color: #fff;
     --dark-bg-color: #222;
     --text-color: #111;
     --text-hover-color: #4a4a4a;
     --dark-text-color: #fcfcfc;
     --highlight-color: #fff9c0;
     --select-color: #bfdcea;
     --link-color: #0073aa;
     --active-link-color: #005177;
     --background-gray: #767676;
     --neutral-gray: #ccc;
     --screen-reader-focus-color: #f1f1f1;
     --screen-reader-text-color: #21759b;
     --full-black: #000;
     --blue-black: #000e14;
     --user-blue: #008fd3;
     --light-gray: #ccc;
 }

The whole process took me about an hour, but it was worth it because it makes things like Night Mode, or even custom color themes a snap to develop in the future. From an accessibility standpoint, you could offer this to aid colorblind users. From a marketing standpoint, you could rotate colors around time of year if your business is seasonal. Either use case appeals enough to me that I’m strongly considering structuring my custom CSS sheets like this in the future.

Next we needed the JavaScript to actually make the switch. Luckily for me, most of the browsers that support CSS variables also support the CSS API for JavaScript and the “supports()” API function. This forms the other half of our fallback scenario. By checking if the browser supports CSS variables before we make any modifications to the page, we will never show the Night Mode button to a user who can’t use it.

The code isn’t commented, but it also isn’t complex:

if(window.CSS && CSS.supports('color', 'var(--text-color)')){
     var body = document.getElementsByTagName('body')[0];
     var nightCSS = ':root{--main-bg-color: #222;--dark-bg-color: #000;--text-color:#fff; --background-gray: #a6a6a6; --link-color: #afb4c6;}#nightmode-toggle::before{color: var(--highlight-color);}';
     var dayCSS = ':root{--main-bg-color: #fff;--dark-bg-color: #222;--text-color:#111;--background-gray: #767676;--link-color: #0073aa;}#nightmode-toggle::before{color: var(--dark-bg-color);}';
     body.innerHTML += '<style id="nightmode"></style><div id="nightmode-controls"><button title="Toggle Night-Mode" id="nightmode-toggle"></button></div>';
     var style = document.getElementById('nightmode');
     if(localStorage.getItem('nightmode') == 'true'){
         style.innerHTML = nightCSS;
     }
     document.getElementById('nightmode-toggle').addEventListener('click', function(e){
         nightmode.toggle(e);
     });
 }
 var nightmode = {
     toggle: function(e){
         if(localStorage.getItem('nightmode') == 'true'){
             style.innerHTML = dayCSS;
             localStorage.setItem('nightmode', 'false');
         }else{
             style.innerHTML = nightCSS;
             localStorage.setItem('nightmode', 'true');
         }
     }
 };

A little more style tweaks to get the controls up in the right hand corner of the page, and we’re off to the races. You can also see I elected to save and fetch the user’s state to local storage. This means the setting will persist page to page, and session to session.

You’ll also note that if you have the console open, the above code makes jQuery a little angry when trying to process the event bubbling. I haven’t yet determined where that conflict is coming from, but I wanted to stay away from jQuery for this so that the resulting code could be relatively portable.

The Results:

Click the button with the lightbulb and see for yourself. I’m happy with the results, but as the header says: nothing is ever finished. I’m sure I’ll tweak the exact color definitions. I’d like to take this a little further, letting users roll their own custom themes, adjust font sizes on the fly without having to overwrite the website’s styles, and just generally improve the idea.